I was recently asked if the out of the box approval process for SharePoint 2010 allowed for individuals to approve documents when an item was sent for approval to a group of people individually which they wanted the flexibility to change each time without relying on the server team to keep adding users to an AD group.
At this point it is worth noting you can achieve what I am about to describe a lot easier if you have all users in one AD group and do not assign a single task to each user. In my case this was not achievable as the client wanted flexibility to add and remove suggested approvers adhoc (assuming they have the approval rights!).
So something always to consider when setting up approval process (or any workflows for that matter) is planning for the ‘what if’s’ and what I mean by that is if you have a rigid approval process where one person is the designated approver – what happens when they go on holiday (or leave)? So my point here is if you leave a little flexibility in your workflow it will give you the room to achieve the end result without lots of pain or reverting to non SharePoint methods of achieving your goal.
So back to the point of my post to my surprise I couldn't find a way to achieve parallel 1 user approval (when multiple people selected to approve) using the SharePoint 2010 Approval workflow.
SharePoint Designer to the rescue, and before you panic there's no code just some tweaks required.
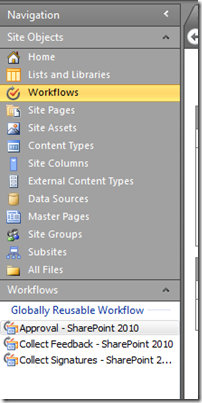
Firstly what you need to do is open SharePoint Designer 2010 (if you don't have this you can download this for free from http://sharepoint.microsoft.com/en-us/product/related-technologies/pages/sharepoint-designer.aspx). Once opened navigate to the site you want to apply the workflow to and simply click on workflows on the left hand side as shown below.
 .
.
Right click on ‘Approval – SharePoint 2010’ workflow and select copy and modify. Rename the new workflow to something suitable which in my case I called 'Parallel 1 User Approval Workflow’.

Leave content type as all and click ok. Click save from the menu and you will now see your workflow appear in the left hand column (under reusable workflow..
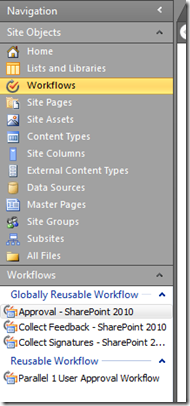
Click on the newly created workflow from the menu.

Click ‘Edit workflow’. You will be presented with Step 1 as shown below:

Click on ‘Approval Workflow Task (en-US) Copy’

I renamed the Task above to ‘Parallel Approval Workflow Task’. I appreciate the menu’s all look a bit the same but do bear with me. So the next step is to click on ‘Change the completion conditions for this task process’.
Now the next screen may look a little intimidating but it’s fairly simple to change!

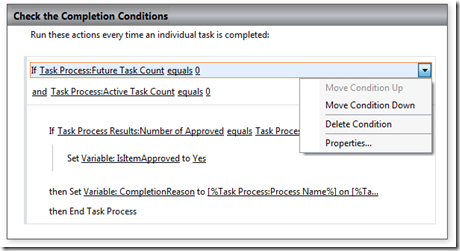
The next step here is to remove a couple of lines and edit one of the conditions. Simply remove the first 2 conditions from the process by hovering over the drop down and selecting ‘Delete Condition’ as shown below.
Once you have removed the first two conditions you should have a process like below:

Notice that there is a ‘Insert a condition’ at the top. What need to do here is recreate the condition of the first If statement with a slight change, Before we do this we need to arrange the outcome conditions as shown below by moving them up and down until the are at the same level as shown below:
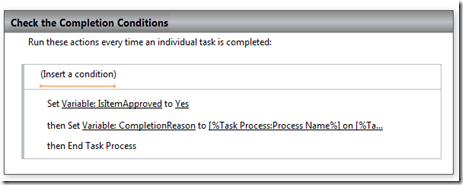
Click on ‘Insert a condition’ then from the menu on the ribbon select condition drop down and this is the important part select ‘If taks outcome equals value’ as shown below.
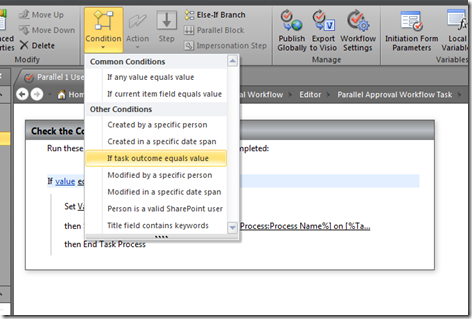
Next click on the field tab and select ‘Number of Approved’ and in the field value enter 1. So the statement should read:
If Tasks Process Results:Number of Approved equals 1.
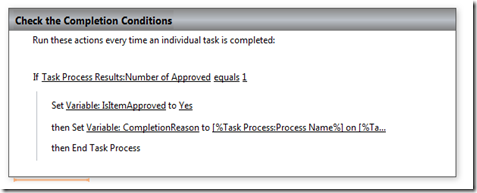
So what I have basically changed is how many approvers it takes to meet the condition before setting the document to approved by basically setting the count to 1. Therefore as soon as one approver has approved the document this condition passes and the document gets approved! The great thing here is that all other tasks assigned to other approvers automatically cancel.
Once you have edited your workflow click save and don't forget to publish! If like me you’re running this off a VM on your laptop this may take sometime! If it fails on the first attempt try again.
You will be prompted with an error shown below regarding creating visuals just click ok.

Once you’ve published the workflow back in the browser from the list you want to apply approval, create a new workflow noticing the new workflow appears in the selection list.

Make sure at this stage that content approval is set to on for the list you are about to apply this workflow to. Select the new workflow saved in SharePoint Designer, select the options as shown above giving your workflow a name and click next.
The main point of this exercise is to create a parallel approval workflow so make sure this option is selected from the drop down and also add at least 2 people for the purpose of proving it works correctly.
On the second page make sure when creating the workflow on the list to check the box ‘Update the approval status….’ as shown below:

Next step is to apply the workflow to an item that is in a draft state. Click workflows from the list and select ‘Single Approver Parallel Workflow’.
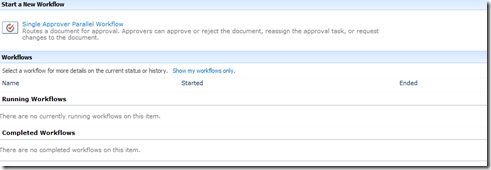
Click start leaving the defaults.

So now back on the list (in my case a pages library) notice the workflow showing ‘In Progress’

Click on the ‘In Progress’ link and this will show you tasks assigned to Paul and John.

The quickest way to approve the item for test is to approve the document on behalf of the user for the purposes of this test. Click on one of the tasks assigned to the user and click approve. A popup should appear to allow you to approve the item, click ‘Approve’.

Once one of the users has approved the item you should see the workflow progress page as completed (you may need to refresh the page) and the task cancelled next to the approver who didn't get chance to approve the document - see below.

And that's it you’ve now got a parallel approval workflow where only one of the members needs to approve.
As you may know if you’ve reached my blog post there is little documentation on how the workflow works under the hood so I hope you’ve found my post useful.


